skip to main |
skip to sidebar
In this post I will show how I was to create the ‘outhouse’ scene, step by step. This first thing to model was the house; I started off by creating a box with the following properties. My method for this model will be extruding the polygons to form the next part of the wall.
 I start the process like this, extruding the box the same width as itself.
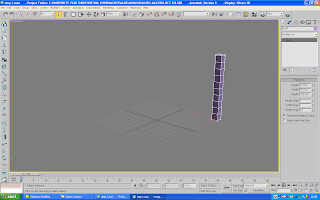
 Finally after thirty extrusions later I have a wall; at this point I will delete some polygons in editable poly mode to create a window or two and a door.

 Ok here I have carried on the process and have created the walls to my house and have the holes cut out for the windows too.

 Around the windows there were holes in the model where I had cut out the holes, in order to fix this, I had to select the edges and use the bridge command fill the gap. This was a time consuming task as I had to do each one individually; I could not select multiple edges and bridge them together without anomalies appearing.

 This is where the fun part began; I wanted to build the wall as if it was falling down, with edges protruding and sections of the wall missing, in this following image I have selected the house as an element, selected the slice pane and cut a new edge straight down the mid section of a wall so I can start extruding the wall to my liking.
 In this image I have started to manipulate the wall section pulling and pushing the vertices to try to get the wall to look like a section has fallen off.
 Here I have used the connect command to add more geometry to the wall to make my job easier allowing me more vertices to move to get the look that I am looking for.
 With a lot of work the basic structure of my house is complete, I have moved the windows in the walls and added some more and moved the door nearer to one end to let lots of light to be able peek through the model. The extruded parts of the building could have been manipulated a little bit better but this has been a time consuming task. Further tweaking may be required.
 In this image I have added a simple texture without doing the UVW coordinates as it seemed to lie without any problems.
 Here is where I start to make the roof for my house, I create a quick plane with several segments and line it up more then half the width of the house, and rotate it a little bit.
 I will start to modify the plane deleting the polygons and moving the vertices to represent a hole or a section of the roof that has collapsed.
 At first I thought it would be simpler to add a symmetry modifier on the plane to make an exact replica of the first roof section that I have made, this did not really work as I could not extrude the other roof section out a little to make it look a little bit different to the one I had already made. So I had to recreate two different planes that I had modified and attach them together to make a simple object.
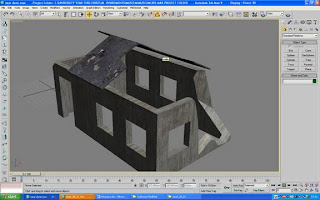
 With the roof complete all I need to do is to add a roof texture and move it into the required position.
 Although I am happy with the end result, the building needs for details to become effective, so I have decided to add more ‘components’ to the scene, some wooden slats to hold the roof up, and maybe some lying on the floor as if they fell from the roof.
 After creating a single wooden slat I applied a symmetry modifier and by using the gizmo on the modifier I am able to move and rotate the new slat in a precise place.

 A simple plaster wooden texture is added to complete the effect.
 Now I have added the slats randomly to the model and have created smaller slats random sizes to sit on the floor plane I will create.
 And here is the finished scene with textures
 Print this post
 I start the process like this, extruding the box the same width as itself.
 Finally after thirty extrusions later I have a wall; at this point I will delete some polygons in editable poly mode to create a window or two and a door.
 Ok here I have carried on the process and have created the walls to my house and have the holes cut out for the windows too.
 Around the windows there were holes in the model where I had cut out the holes, in order to fix this, I had to select the edges and use the bridge command fill the gap. This was a time consuming task as I had to do each one individually; I could not select multiple edges and bridge them together without anomalies appearing.
 This is where the fun part began; I wanted to build the wall as if it was falling down, with edges protruding and sections of the wall missing, in this following image I have selected the house as an element, selected the slice pane and cut a new edge straight down the mid section of a wall so I can start extruding the wall to my liking.
 In this image I have started to manipulate the wall section pulling and pushing the vertices to try to get the wall to look like a section has fallen off.
 Here I have used the connect command to add more geometry to the wall to make my job easier allowing me more vertices to move to get the look that I am looking for.
 With a lot of work the basic structure of my house is complete, I have moved the windows in the walls and added some more and moved the door nearer to one end to let lots of light to be able peek through the model. The extruded parts of the building could have been manipulated a little bit better but this has been a time consuming task. Further tweaking may be required.
 In this image I have added a simple texture without doing the UVW coordinates as it seemed to lie without any problems.
 Here is where I start to make the roof for my house, I create a quick plane with several segments and line it up more then half the width of the house, and rotate it a little bit.
 I will start to modify the plane deleting the polygons and moving the vertices to represent a hole or a section of the roof that has collapsed.
 At first I thought it would be simpler to add a symmetry modifier on the plane to make an exact replica of the first roof section that I have made, this did not really work as I could not extrude the other roof section out a little to make it look a little bit different to the one I had already made. So I had to recreate two different planes that I had modified and attach them together to make a simple object.
 With the roof complete all I need to do is to add a roof texture and move it into the required position.
 Although I am happy with the end result, the building needs for details to become effective, so I have decided to add more ‘components’ to the scene, some wooden slats to hold the roof up, and maybe some lying on the floor as if they fell from the roof.
 After creating a single wooden slat I applied a symmetry modifier and by using the gizmo on the modifier I am able to move and rotate the new slat in a precise place.
 A simple plaster wooden texture is added to complete the effect.
 Now I have added the slats randomly to the model and have created smaller slats random sizes to sit on the floor plane I will create.
 And here is the finished scene with textures
 Print this post
No comments:
Post a Comment